[phpBB Debug] PHP Warning: in file /includes/bbcode.php on line 483: preg_replace(): The /e modifier is no longer supported, use preg_replace_callback instead
[phpBB Debug] PHP Warning: in file /includes/bbcode.php on line 483: preg_replace(): The /e modifier is no longer supported, use preg_replace_callback instead
[phpBB Debug] PHP Warning: in file /includes/bbcode.php on line 483: preg_replace(): The /e modifier is no longer supported, use preg_replace_callback instead
[phpBB Debug] PHP Warning: in file /includes/bbcode.php on line 483: preg_replace(): The /e modifier is no longer supported, use preg_replace_callback instead
[phpBB Debug] PHP Warning: in file /includes/bbcode.php on line 483: preg_replace(): The /e modifier is no longer supported, use preg_replace_callback instead
[phpBB Debug] PHP Warning: in file /includes/bbcode.php on line 483: preg_replace(): The /e modifier is no longer supported, use preg_replace_callback instead
[phpBB Debug] PHP Warning: in file /includes/bbcode.php on line 483: preg_replace(): The /e modifier is no longer supported, use preg_replace_callback instead
[phpBB Debug] PHP Warning: in file /includes/bbcode.php on line 483: preg_replace(): The /e modifier is no longer supported, use preg_replace_callback instead
[phpBB Debug] PHP Warning: in file /includes/bbcode.php on line 483: preg_replace(): The /e modifier is no longer supported, use preg_replace_callback instead
[phpBB Debug] PHP Warning: in file /includes/bbcode.php on line 483: preg_replace(): The /e modifier is no longer supported, use preg_replace_callback instead
[phpBB Debug] PHP Warning: in file /includes/bbcode.php on line 483: preg_replace(): The /e modifier is no longer supported, use preg_replace_callback instead
[phpBB Debug] PHP Warning: in file /includes/bbcode.php on line 483: preg_replace(): The /e modifier is no longer supported, use preg_replace_callback instead
[phpBB Debug] PHP Warning: in file /includes/bbcode.php on line 483: preg_replace(): The /e modifier is no longer supported, use preg_replace_callback instead
[phpBB Debug] PHP Warning: in file /includes/bbcode.php on line 483: preg_replace(): The /e modifier is no longer supported, use preg_replace_callback instead
[phpBB Debug] PHP Warning: in file /includes/bbcode.php on line 483: preg_replace(): The /e modifier is no longer supported, use preg_replace_callback instead
[phpBB Debug] PHP Warning: in file /includes/bbcode.php on line 483: preg_replace(): The /e modifier is no longer supported, use preg_replace_callback instead
[phpBB Debug] PHP Warning: in file /includes/bbcode.php on line 483: preg_replace(): The /e modifier is no longer supported, use preg_replace_callback instead
[phpBB Debug] PHP Warning: in file /includes/bbcode.php on line 483: preg_replace(): The /e modifier is no longer supported, use preg_replace_callback instead
[phpBB Debug] PHP Warning: in file /includes/bbcode.php on line 483: preg_replace(): The /e modifier is no longer supported, use preg_replace_callback instead
[phpBB Debug] PHP Warning: in file /includes/bbcode.php on line 483: preg_replace(): The /e modifier is no longer supported, use preg_replace_callback instead
[phpBB Debug] PHP Warning: in file /includes/bbcode.php on line 483: preg_replace(): The /e modifier is no longer supported, use preg_replace_callback instead
[phpBB Debug] PHP Warning: in file /includes/bbcode.php on line 483: preg_replace(): The /e modifier is no longer supported, use preg_replace_callback instead
[phpBB Debug] PHP Warning: in file /includes/bbcode.php on line 483: preg_replace(): The /e modifier is no longer supported, use preg_replace_callback instead
[phpBB Debug] PHP Warning: in file /includes/bbcode.php on line 483: preg_replace(): The /e modifier is no longer supported, use preg_replace_callback instead
[phpBB Debug] PHP Warning: in file /includes/bbcode.php on line 483: preg_replace(): The /e modifier is no longer supported, use preg_replace_callback instead
[phpBB Debug] PHP Warning: in file /includes/bbcode.php on line 483: preg_replace(): The /e modifier is no longer supported, use preg_replace_callback instead
[phpBB Debug] PHP Warning: in file /includes/bbcode.php on line 112: preg_replace(): The /e modifier is no longer supported, use preg_replace_callback instead
[phpBB Debug] PHP Warning: in file /includes/bbcode.php on line 112: preg_replace(): The /e modifier is no longer supported, use preg_replace_callback instead
[phpBB Debug] PHP Warning: in file /includes/bbcode.php on line 112: preg_replace(): The /e modifier is no longer supported, use preg_replace_callback instead
[phpBB Debug] PHP Warning: in file /includes/functions.php on line 4586: Cannot modify header information - headers already sent by (output started at /includes/functions.php:3765)
[phpBB Debug] PHP Warning: in file /includes/functions.php on line 4588: Cannot modify header information - headers already sent by (output started at /includes/functions.php:3765)
[phpBB Debug] PHP Warning: in file /includes/functions.php on line 4589: Cannot modify header information - headers already sent by (output started at /includes/functions.php:3765)
[phpBB Debug] PHP Warning: in file /includes/functions.php on line 4590: Cannot modify header information - headers already sent by (output started at /includes/functions.php:3765)
Tascione • View topic - getting this mill to work

getting this mill to work

Welcome to the forum!
All visitors are welcome to view topics and posts.
MEMBERSHIP AND POSTING IS RESERVED FOR TASCIONE COURSE MEMBERS ONLY... http://www.tascione.com

Moderators: willofiam, Bob Tascione

getting this mill to work

Postby Nic422 » Thu Jun 02, 2016 1:37 pm

Hi guys, I have recently found this Hardinge watchmakers vertical mill attachment to fit on my peerless lathe. I am excited to have found it because it is American made and will match
the peerless. Problem is, on the cross slide, the spindle center only goes as far low as about one inch above the lathe spindle center. My question is, is this normal, or should I look
for a single slide for it? Anyone here know how this mill was originally meant to be used and is it possible for my goal to get the slide hooked up with an indexing attachment which would mean the cutting gears would be on the lathe itself.

Other question is does anyone know who can make me a handle for the mill turn as the one that was there was obviously lost somewhere.

please advise and many thanks.


IMG_6954.JPG
IMG_6954.JPG (95.1 KiB) Viewed 12531 times


IMG_6950.JPG
IMG_6950.JPG (90.22 KiB) Viewed 12531 times
User avatar
Nic422
 
Posts: 66
Joined: Fri Mar 14, 2014 7:29 pm

Re: getting this mill to work

Postby Bob Tascione » Thu Jun 02, 2016 11:48 pm

Hi Nic,
Not sure from the pics but If that's a Hardinge compound then it probably won't fit that lathe well for you. Your Hardinge compound has a locating bar on it that butts up against an angle on the Hardinge lathe to square it up as shown in the pics of my Hardinge Cataract lathe. Note that the angle on the bar matches the angle on the bed. It's quite possible that it's also for a larger swing lathe. You can always put a dividing plate on it as you suggest and that may work for you. Can you possibly rotate the spindle so it's in the vertical position? I don't have a milling attachment for my Hardinge and can't tell too much from the pic but if you can rotate it, mount a pulley onto the back of the spindle where the draw bar slides in and attach the compound securely to the bed of your Peerless it may just work for you. A bit of creative thinking can sometimes go a long ways.
Hope this helps Nic,
Bob

IMG_0361.jpg
Bar on underside of compound to square slide to lathe bed
IMG_0361.jpg (56.36 KiB) Viewed 12519 times


IMG_0362.jpg
Another view of squaring bar
IMG_0362.jpg (67.29 KiB) Viewed 12519 times


IMG_0364.jpg
Bar pressed up against lathe bed
IMG_0364.jpg (57.46 KiB) Viewed 12519 times


IMG_0381.jpg
Another view of Hardinge Cataract Compound
IMG_0381.jpg (51.77 KiB) Viewed 12519 times
User avatar
Bob Tascione
 
Posts: 1545
Joined: Fri Apr 30, 2010 1:55 pm

Re: getting this mill to work

Postby Bob Tascione » Fri Jun 03, 2016 11:34 am

Nic,
I just took a look at your pics on a larger computer screen and zoomed in on them. I can see now that it's not a Hardinge slide rest. Looks a bit like my Boley cross slide? If that's the case then it also won't fit your Peerless properly. The indexing plate mounted on the milling attachment may well be the way to go. If you wanted to put an indexing plate on your peerless you may need to make an extension sleeve of some type to fit over your spindle cuz in your pics it doesn't look like your spindle extends too far out to accomodate an index plate? Could be wrong about that though. Pretty hard to determine that from the pic and I don't have a Peerless lathe I can compare it to. If you do need to extend it out a little then you would need to use a longer draw bar too.

Bob
User avatar
Bob Tascione
 
Posts: 1545
Joined: Fri Apr 30, 2010 1:55 pm

Re: getting this mill to work

Postby Nic422 » Fri Jun 03, 2016 11:20 pm

Thanks for the pics Bob. Yes it's a Boley for another lathe, which means I need to find a Marshall, or Hardinge cross slide for it.

Looks like there is just no easy way to get this to work though. After examining the Hardinge, there is no apparent room for the indexing attachment on it, the spindle is too short, so I'd need to find a pulley for it, then there's another issue with the spindle which is a bit tight. As for creating an index attachment on the Peerless, I could use the drawbar as the holder for the index plate to screw on to since the head is metal, but then I'd need to create some kind of attachment for a pin and lever on the bed or headstock (for regulation the index plate). What to do, what to do.
User avatar
Nic422
 
Posts: 66
Joined: Fri Mar 14, 2014 7:29 pm

Re: getting this mill to work

Postby Bob Tascione » Sat Jun 04, 2016 8:17 am

Hi Nic,
You should be able to set it up to work for you without much trouble. If you do mount it to the knob it would be good if you could pick up another drawbar and dedicate that one to the indexing attachment. Not necessary of course but convienient.
You can also make room for a locating bracket with arm and indexing pin by moving the headstock forward a little bit which will give you some lathe bed to use for mounting a simple assembly onto. Would only need to move the spindle forward a tiny bit for a thin clamp that could slip over the bed. Maybe 10mm or so. As for the index plate, yes you can do exactly what you said and mount it onto the drawbar knob or make an expanding mandrel that would slip into the drawbar hole and then expand when a nut is tightened down. We used to make these quite often when machining for work piece stops and/or supports for long pieces. I can draw up a simple design for one if you would like to go that route. Would be easy to make using your Peerless and a jewelers saw possibly. The spindle tightness should be adjustible in some similar fashion to a normal headstock spindle? Would just need to back off the nuts a tiny bit. Not sure how that spindle is set up though. Wouldn't worry too much about the locking pin setup though. I've seen some setups where the center hole on the end of the bed has been drilled out and threaded to mount the arm. Not sure how hard the steel on that bed is. If worse came to worse the arm can actually be mounted on the bench! lol
Oh, I also wanted to ask. If you still wanted to use the spindle in the horozontal position that is shown in your pics would it be possible to mount it (the spindle) onto a sub-plate which extends down further? That question isn't too clear I know. To put it another way: Can you mount the spindle onto a plate and then mount that plate onto the vertical slide or is the spindle part of the slide that has the nut mounted to it that the lead screw feeds through? Whew I just read that question again and it's confusing too. Let me know if it makes no sense to you.
Bob
User avatar
Bob Tascione
 
Posts: 1545
Joined: Fri Apr 30, 2010 1:55 pm

Re: getting this mill to work

Postby Nic422 » Sat Jun 04, 2016 6:31 pm

This is really great. Thanks for the encouragement Bob! I think I have figured out a way to make an adjustable index pin holder that would attach to a metal block that sits under the headstock and locks in with the headstock lock. It would be hidden and I could fashion a lever that looks like the Headstock lock lever to it that would swing and have a pin that adjusts on it similar looking to the normal index pin to adjust the index plate with. I think I could turn most of these all on the lathe, then use cuts and dies for making threads if needed. Thanks for the help and as for the question about lowering the mill on the plate using another plate attached to the main plate, I'm not sure as I can't remove some of the screws that are already so tight, but looking in to that.
User avatar
Nic422
 
Posts: 66
Joined: Fri Mar 14, 2014 7:29 pm

Re: getting this mill to work

Postby Nic422 » Tue Jun 07, 2016 11:39 am

So, Bob, my next question would be, when looking for index plates, what hole counts are recommended and needed for American Pocket Watch gears, pinons, escape wheels, for Hamilton, South Bend, Illinois, Howard, etc.?
User avatar
Nic422
 
Posts: 66
Joined: Fri Mar 14, 2014 7:29 pm

Re: getting this mill to work

Postby Nic422 » Tue Jun 07, 2016 1:29 pm

User avatar
Nic422
 
Posts: 66
Joined: Fri Mar 14, 2014 7:29 pm

Re: getting this mill to work

Postby Bob Tascione » Wed Jun 08, 2016 8:28 pm

Hi Nic,
Sorry for the delay. I've been mobile for a couple of days now and tough trying to post with iPhone. Just that line took me forever to type on this thing! Hope to be back home late this evening and will try to get a response out to you in the morning.

Bob
User avatar
Bob Tascione
 
Posts: 1545
Joined: Fri Apr 30, 2010 1:55 pm

Re: getting this mill to work

Postby Bob Tascione » Thu Jun 09, 2016 9:04 am

User avatar
Bob Tascione
 
Posts: 1545
Joined: Fri Apr 30, 2010 1:55 pm

Re: getting this mill to work

Postby Nic422 » Fri Jun 10, 2016 11:11 pm

wow, thanks for the numbers Bob! Where did you get that information?

as far as the mainspring barrel, I guess I could look at one of my pocket watch barrels and count the teeth to find out how many cuts it would need.

Nic
User avatar
Nic422
 
Posts: 66
Joined: Fri Mar 14, 2014 7:29 pm

Re: getting this mill to work

Postby willofiam » Sat Jun 11, 2016 9:30 am

Hey Nic, looks like you and Bob have it all figured out..... you will have a nice setup soon, hope to see lots of pictures when you get it up and running. William
Have a great day, William
User avatar
willofiam
 
Posts: 1435
Joined: Fri Feb 10, 2012 5:47 pm

Re: getting this mill to work

Postby Bob Tascione » Sat Jun 11, 2016 1:05 pm

You're welcome Nic
Jumped into an internet cafe for a few minutes.
For your post I mostly got my info from my own notes and tables I setup for a design and program I was working on for a digital stepper motor indexer that I could run from my laptop. By first knowing the most 'practical' tooth counts and gear ratios that could be used in horological applications for beats up 18000 I could populate an array and use those variables to run a stepper motor. Emphasis on the word practical as there would be an infinite number of variations possible but not logical. The problem with making a digital indexer with a fixed number of divisions available really didn't offer much advantage over normal physical indexers. I eventually came up with a stand alone design and program that could use off the shelf micro-controllers and by feeding back and manipulating a continous flow of data from a rotary encoder was able to write some code capable of forward and reverse incrementing of a large number of divisions covering anything I'll ever need within fairly close tolerances. Way more than acceptible for horological applications. I had some big issues with cumulative error in the beginning which drove the tolerances into the mud and out of acceptable range which drove me nuts until eventually coming across some code posted online from a guy much smarter than I am that corrected it.
When I researched the common tooth counts and ratios most used in horology I found lots of info from old books and articles and most said pretty much the same thing. Donald De Carles "Watch & Clock Encyclopedia" was one good source as well as some other books and some old articles from past 'Bulletins and or Horological Times?'.
I'm thinking of making that unit available so if you're in no hurry...??

Adios for now,
Bob
User avatar
Bob Tascione
 
Posts: 1545
Joined: Fri Apr 30, 2010 1:55 pm

Re: getting this mill to work

Postby Nic422 » Mon Jun 13, 2016 12:23 am

The first time I read this I was in a daze :) Thanks for explaining it all though!

But now I kind of understand. So you are saying this would work for most American Pocket watch movements (which are all movements up to 18000 bph) based on your own research with the code you wrote, the code the guy online wrote, and what you had read right :)

How would one figure in the barrels?
User avatar
Nic422
 
Posts: 66
Joined: Fri Mar 14, 2014 7:29 pm

Re: getting this mill to work

Postby Nic422 » Mon Jun 13, 2016 9:23 am

I just counted a couple times on a etc unitas mainspring barrel and the teeth count is 101. Does that mean you need 101 cuts, or 100?
User avatar
Nic422
 
Posts: 66
Joined: Fri Mar 14, 2014 7:29 pm

Re: getting this mill to work

Postby Bob Tascione » Sat Jun 18, 2016 12:05 pm

User avatar
Bob Tascione
 
Posts: 1545
Joined: Fri Apr 30, 2010 1:55 pm

Re: getting this mill to work

Postby Nic422 » Sat Jun 18, 2016 8:54 pm

Wow, that's an impressive and inventive way of doing things! So did you somehow hook this stepper motor up to the Head stock section of a Jewelers lathe to turn the headstock spindle bit by bit and do the cutting with a milling attachment on a compound slide rest? Do you have any pics of this set up?

I also had another question. I have what is supposedly an American Watch Tool compound slide rest (although I can not find a logo on the unit) with similar base to a Marshall.

s-l1600-1.jpg
s-l1600-1.jpg (31.67 KiB) Viewed 12393 times


However it is missing the foot.

s-l1600.jpg
s-l1600.jpg (36.66 KiB) Viewed 12393 times


Do you know anywhere I can find a foot? If not, what kind of metal is advisable to be used to make one? metaldepot.com has different measurements I can buy but in many types of metals. Which do you recommend?
User avatar
Nic422
 
Posts: 66
Joined: Fri Mar 14, 2014 7:29 pm

Re: getting this mill to work

Postby Bob Tascione » Sun Jun 19, 2016 10:57 am

Hi Nic,
Never placed everything into it's own enclosure for a permanent setup. Shelved the project about a year or so ago and figured I could jump back on it when I had a little time. Still waiting for that time. Will eventually get back to it and hopefully make it available online. We'll see. It's still mounted on a breadboard awaiting some tweaking and an enclosure. I did set it up on an 8mm lathe for testing though. Didn't mount it behind the spindle for the test but put a three jaw chuck on the lathe which held a 6mm pin for mounting a small timing pulley with 6mm hole. Then ran a timing belt to a an equal diameter pulley which was attached to the motor. I held the motor in a small vise mounted to a board. It worked fine. One could actually mount the unit onto the lathe in this fashion (in front of the spindle) and cut a gear between centers if some means of support could be devised. When done it could be removed quickly from the lathe and put onto another lathe if desired. Anyway hope to finish it up someday.

Just about any steel should work for you. You don't need to worry much about strength since it's just finger tightened. Something like 1018 or 12L14 would actually do fine. 12L14 being the easier to machine out of the two. No need to go to the hot rolled steels like 4140, 4150 etc. as warpage isn't a concern at all. Those would be a little better though strength wise if you can get some cheap but not needed. Also higher carbon steels aren't necessary unless you want to heat treat it for some reason. If you're gonna be turning it with a hand graver on your watchmakers lathe then I would probably just grab a pices of the 12L14 (or try whatever you might have laying around the house). 12L14 has lead in it which makes it very easy to machine.

Probably better choices out there but I don't think it's all that important for that application.

Bob
User avatar
Bob Tascione
 
Posts: 1545
Joined: Fri Apr 30, 2010 1:55 pm

Re: getting this mill to work

Postby Nic422 » Tue Aug 07, 2018 9:17 pm

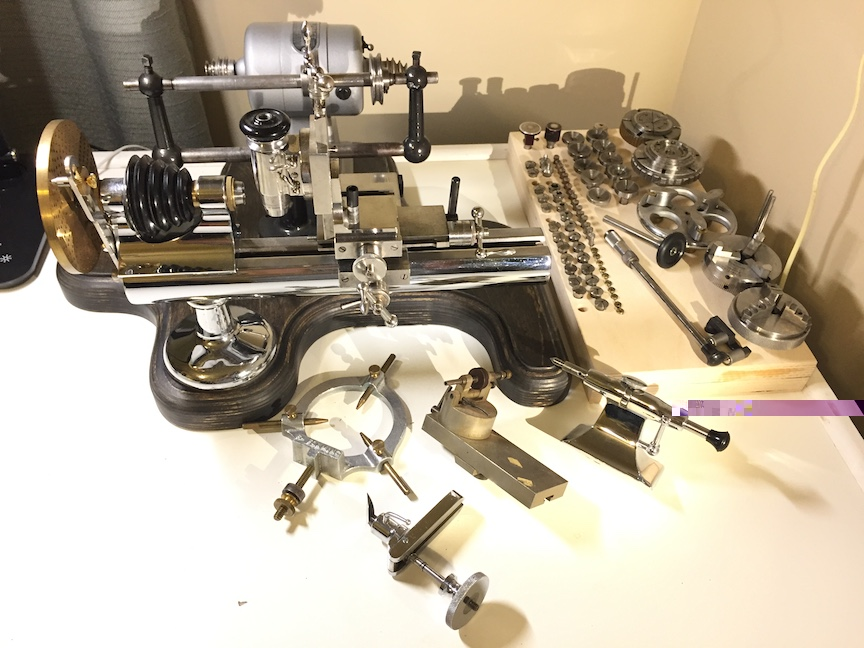
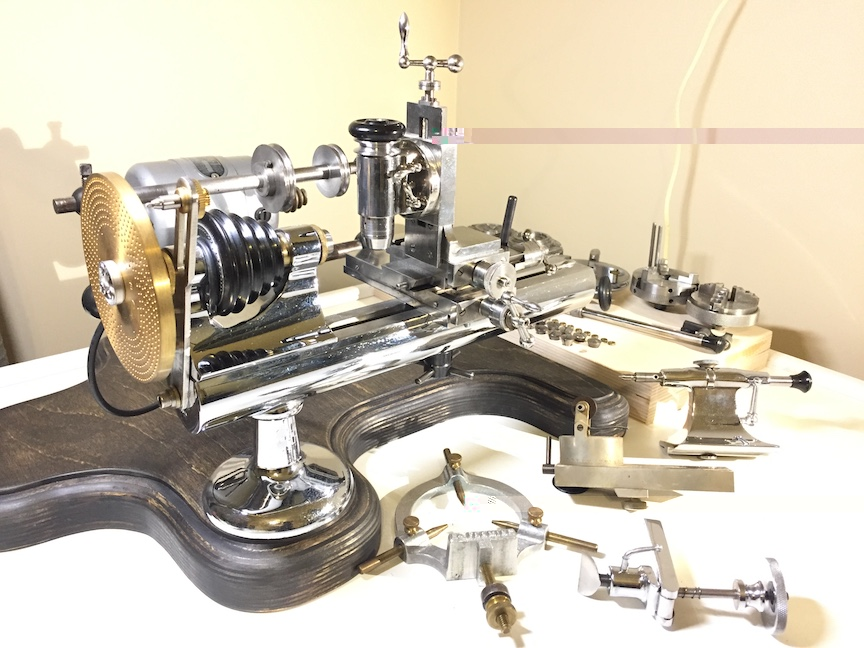
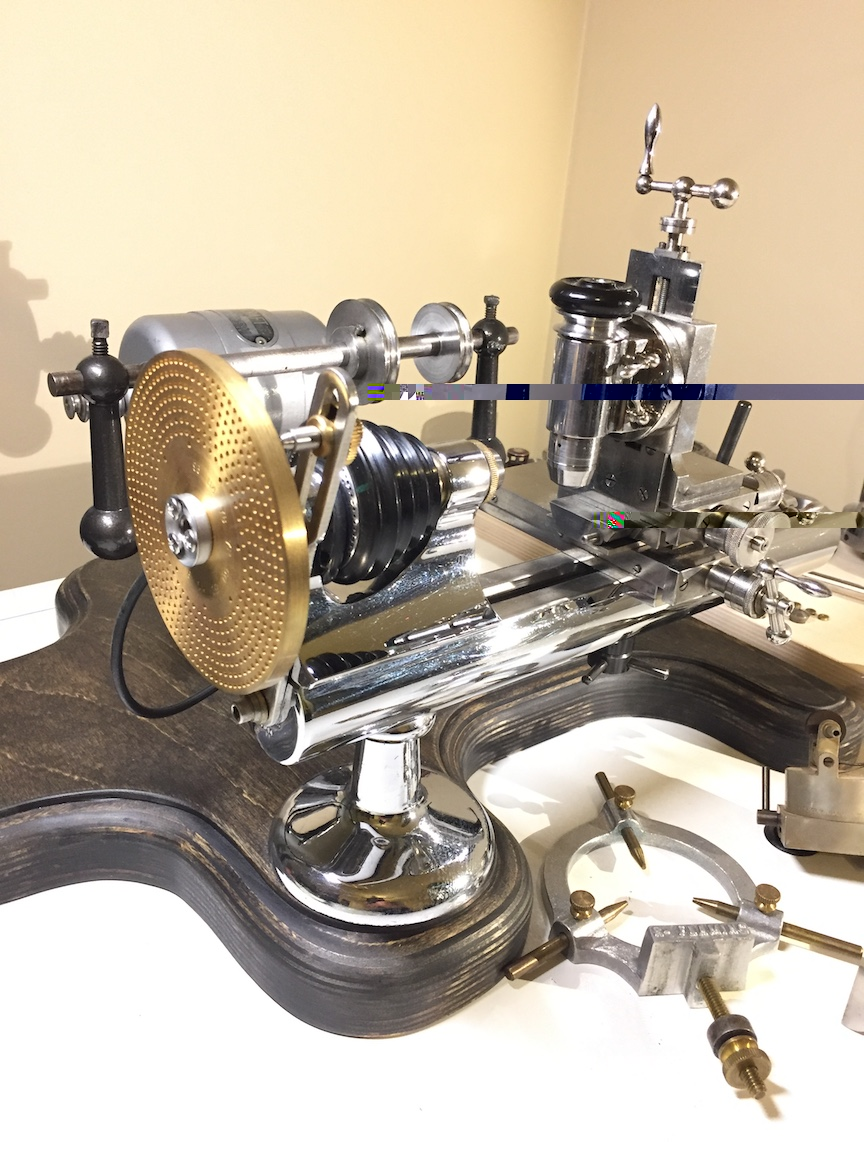
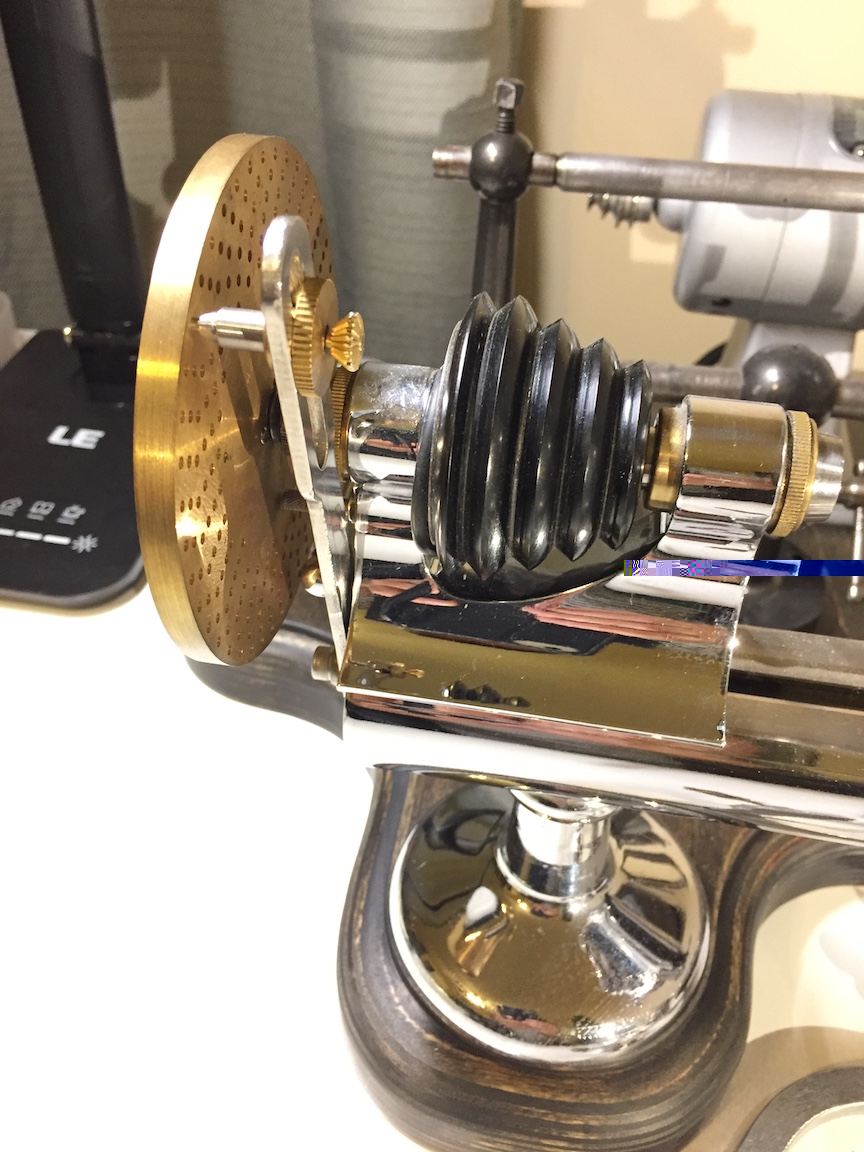
I had gotten to a point where I've been wanting to post the update of rebuilding and re-accumulating parts and accessories for an all American lathe set up (as might of been used by early American watch makers), and then well life happened and I got busy with other stuff. Well, I thought before waiting any more I would update this thread as William was interested in seeing the set up when it was completed. Well, it's not completed yet, but I have collected many parts and made a few to complete unfinished and broken ones like the handle on the turn for the mill, a custom wood base, a foot for a older era Marshall cross slide, and even made my own spring operated pinning set up for catching the index out of a cheap case back opening tool, and was able to find a way of attaching an index to the headstock collet holder (of course it is crude and needs re-thinking). Did a lot of refinishing and replacing of old rusted out and oxidized accessories. What's left is a proper rigging of the countershafts, pulley set up, and gear cutters, etc. Any added thoughts?

IMG_2239.JPG
IMG_2239.JPG (185.07 KiB) Viewed 11218 times


Some of the brands used are Peerless, Marshall, Hardinge, Snyder, Early Levin, Witcomb, Fleming, etc. However there is one modern Sherline chuck in the mix, and a Borel six jaw chuck.

IMG_2232.JPG
IMG_2232.JPG (186.93 KiB) Viewed 11218 times

IMG_2236.JPG
IMG_2236.JPG (310.79 KiB) Viewed 11218 times

IMG_2234.JPG
IMG_2234.JPG (293.08 KiB) Viewed 11218 times
User avatar
Nic422
 
Posts: 66
Joined: Fri Mar 14, 2014 7:29 pm


Return to General Discussion Forum

Who is online

Users browsing this forum: No registered users and 7 guests

cron